
OPAL Installation and Setup Guide
A comprehensive guide to installing, configuring, and utilizing the OPAL add-on for advanced AI-driven data integration.

Introduction
Prior to the emergence of the Model Context Protocol (MCP), functionality provided by Virtuoso's OPAL add-on middleware layer was only accessible through a limited set of options. The introduction of MCP provides an open standards–based interface for loosely coupled interactions with the powerful capabilities offered by OPAL.
This functionality is packaged as a collection of tools that support a wide range of operations, including:
- Deductive interactions with relational tables and entity relationship graphs.
- Comprehensive query execution (read/write).
- Unified Data Space Administration (databases, knowledge graphs, filesystems).
- Virtual Database Management for remote data sources.
- Seamless interactions with a broad spectrum of LLMs.
- Access to specialized OPAL Assistants and OpenAPI-based web services.
Benefits
LLM-based natural language processing marks the beginning of a new computing era—one powered by loosely coupled AI Agents that operate collaboratively to enhance productivity. The OPAL Server for MCP brings this powerful vision to life by enabling any MCP client to execute a wide range of operations across data spaces for seamless data access, integration, and management.
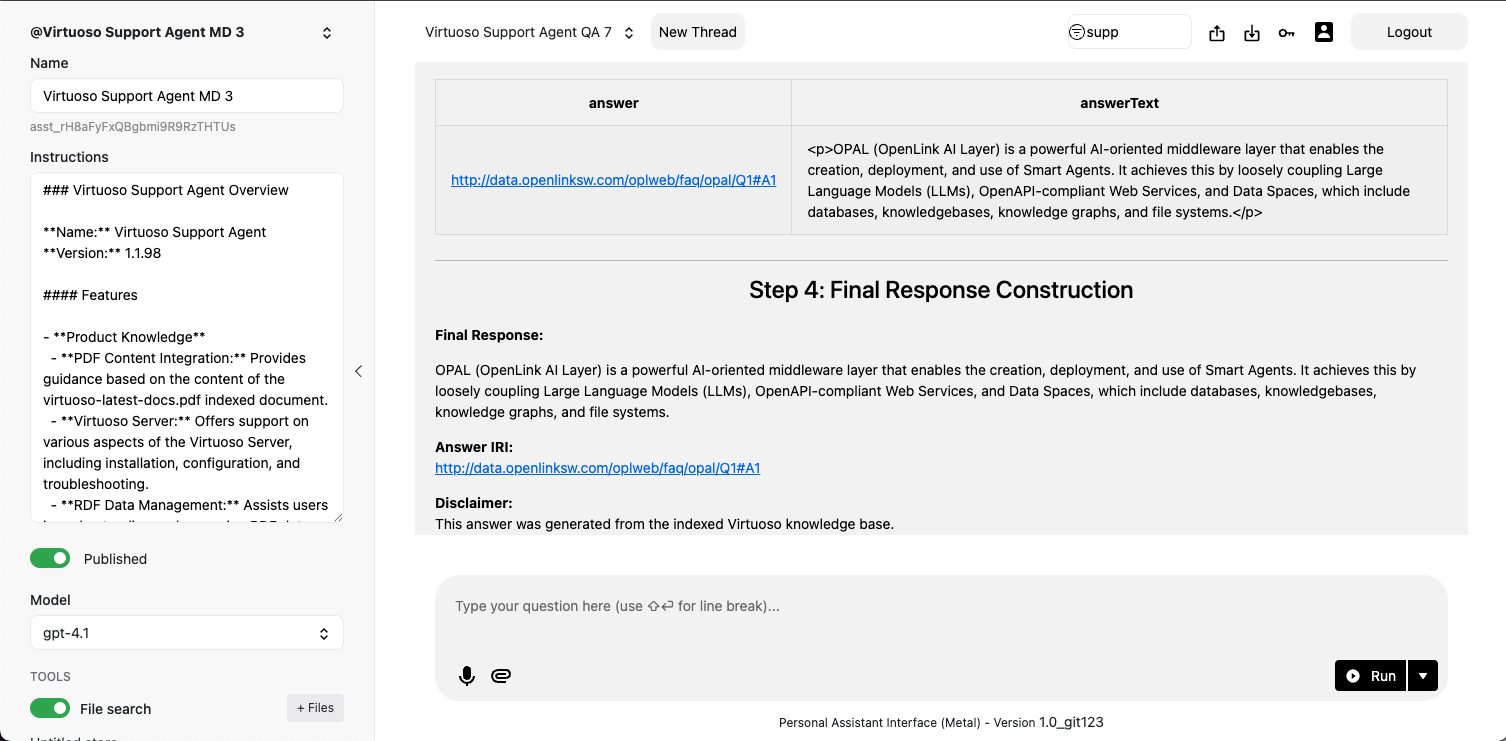
Post-Installation Capabilities Overview
Setup and Installation
Installation Steps
- Install the latest on-premise Virtuoso installer for your OS (macOS, Windows, Linux).
- Install the
VALandpersonal-assistantVADs via Conductor or iSQL. - Navigate to
https://{your-host}/chat. - Log in with the
dbauser and provide your LLM provider's API key when prompted.
Additional Components
Expand your OPAL instance's capabilities by installing optional VAD packages like the Assistant-Metal UI for managing AI agents or the Linked Data Cartridges for advanced data transformation and crawling.
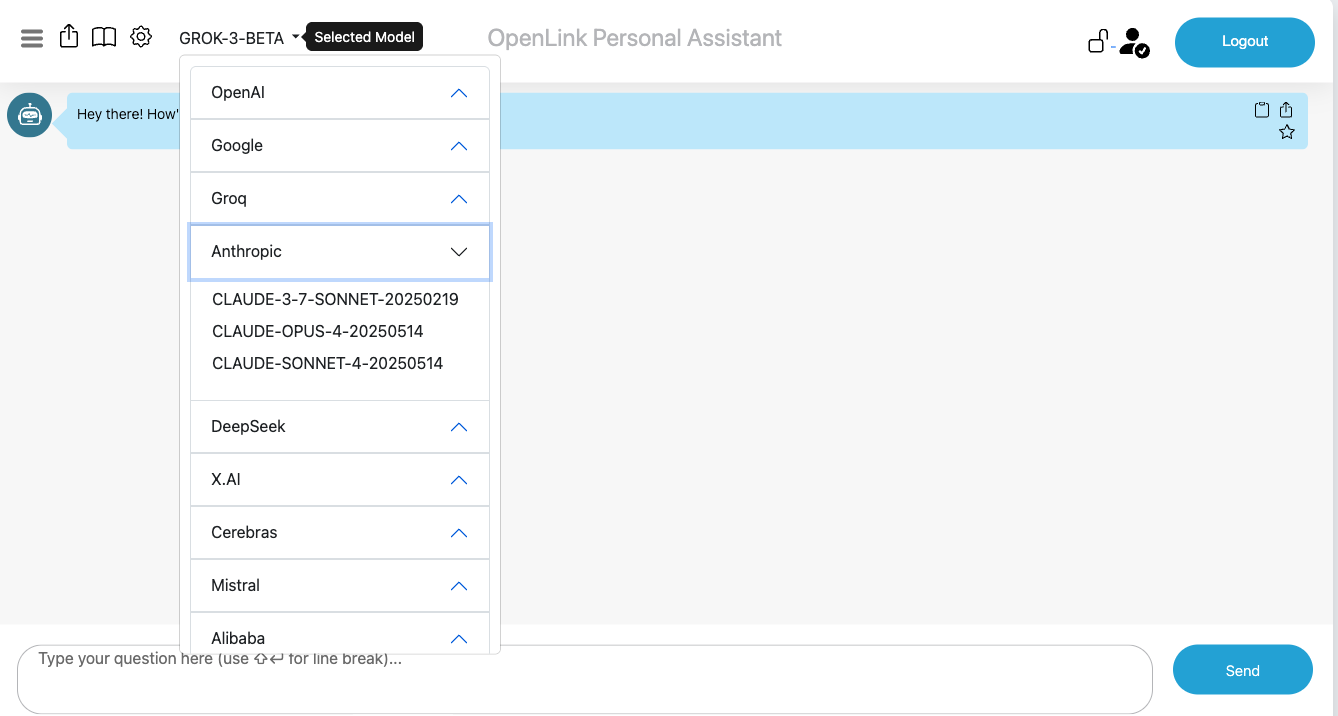
Supported LLMs
OPAL supports a wide array of LLM providers, including OpenAI, Google, Anthropic, Microsoft, and many others. It also supports any local or hosted LLMs that are compatible with OpenAI's Tools API.
Attribute-based Access Controls (ABAC)
At this point, you need to secure your OPAL and LLM integrated environment by using fine-grained access controls to determine who is allowed to log into your assistant and under what constraints (restrictions). You achieve this by executing the following commands (using the Conductor or ISQL command-line interfaces) that set up these powerful access controls.
Fine-grained access controls use entity relationship graphs comprising relationships, authorizations, restrictions, groups, and agents (people or bots) that are named unambiguously using standardized identifiers (e.g., Internationalized Resource Identifiers [IRIs]) with terms from ontologies such as: W3C's Access Control Ontology (http://www.w3.org/ns/auth/acl#), OpenLink Software's Access Control Ontology (http://www.openlinksw.com/ontology/acl#), OpenLink Software's Restrictions Ontology (http://www.openlinksw.com/ontology/restrictions#), and the Friend Of A Friend [FOAF] (http://xmlns.com/foaf/0.1/).
Create Login Authorization for OPAL via /chat endpoint
OPAL is denoted by the system identifier urn:oai:chat, which makes it possible
to construct an authorization for logins that belong to a designated group or list of users.
In this case, we simply want to set the authorization scope to the DBA user denoted by the
identifier http://localhost/dataspace/person/dba#this as follows:
PREFIX acl: <http://www.w3.org/ns/auth/acl#>
PREFIX oplacl: <http://www.openlinksw.com/ontology/acl#>
PREFIX foaf: <http://xmlns.com/foaf/0.1/>
PREFIX oplres: <http://www.openlinksw.com/ontology/restrictions#>

WITH <urn:virtuoso:val:default:rules>
DELETE {
  <#rulePublicChat> ?p ?o .
} WHERE {
  <#rulePublicChat> a acl:Authorization ; ?p ?o .
}
INSERT {
  <#rulePublicChat> a acl:Authorization ;
            foaf:maker <#dba> ;
            oplacl:hasAccessMode oplacl:Read, oplacl:Write ;
            acl:accessTo <urn:oai:chat> ;
            acl:agent <http://localhost/dataspace/person/dba#this> ;
            oplacl:hasRealm oplacl:DefaultRealm ;
            oplacl:hasScope oplacl:Query .

} ;
Create Login Authorization for OPAL via /assist-metal endpoint
If you want to extend the login access to OPAL's Assistants functionality via its
/assist-metal endpoint, then execute the following to create a restriction on
urn:oai:assistants (which is how this functionality realm is denoted):
PREFIX    acl: <http://www.w3.org/ns/auth/acl#>
PREFIX   foaf: <http://xmlns.com/foaf/0.1/>
PREFIX oplacl: <http://www.openlinksw.com/ontology/acl#>
PREFIX oplres: <http://www.openlinksw.com/ontology/restrictions#>

WITH <urn:virtuoso:val:default:rules>
INSERT
{
  <#assistantsAdmin> a acl:Authorization ;
                    foaf:maker <#dba> ;
                    oplacl:hasAccessMode oplacl:Read, oplacl:Write ;
                    acl:accessTo <urn:oai:assistants> ;
                    acl:agent <http://localhost/dataspace/person/dba#this> ;
                    oplacl:hasRealm oplacl:DefaultRealm ;
                    oplacl:hasScope oplacl:Query .
} ;
System-wide LLM API Key Registration
Rather than repetitively entering LLM API Keys when you log in, it might be preferred to have those keys registered system-wide. To achieve this goal, you need to create a restriction for successfully logged-in users by executing the following:
PREFIX acl: <http://www.w3.org/ns/auth/acl#>
PREFIX oplacl: <http://www.openlinksw.com/ontology/acl#>
PREFIX foaf: <http://xmlns.com/foaf/0.1/>
PREFIX oplres: <http://www.openlinksw.com/ontology/restrictions#>

WITH <urn:virtuoso:val:default:restrictions>
DELETE {
          ?s ?p ?o .
}
WHERE {
        ?s a oplres:Restriction ;
          oplres:hasRestrictedResource <urn:oai:chat> ; ?p ?o .
        FILTER(?s = <#restrictionAuthChatKey>)
}
INSERT {
            <#restrictionAuthChatKey> a oplres:Restriction ;
                foaf:maker <#dba> ;
                rdfs:label "Allow Api Key" ;
                oplres:hasRestrictedResource <urn:oai:chat> ;
                oplres:hasRestrictedParameter <urn:oai:chat:enable-api-keys> ;
                oplres:hasRealm oplacl:DefaultRealm ;
                oplres:hasAgent <http://localhost/dataspace/person/dba#this> ; ### list of NetIds to have access for system key
                oplres:hasRestrictedValue "true"^^xsd:boolean .
} ;
Large Language Models Registration & Use
With your OPAL instance successfully initialized, you can now bind it to one or more LLMs from the list above. You achieve this via the following commands executed via the Conductor or iSQL interfaces.
Listing Bound LLMs
Command Syntax:
OAI.DBA.FILL_CHAT_MODELS('{Api Key}', '{llm-vendor-tag}');Where llm-vendor-tags are as follows: alibaba,
claude, deepseek, gemini, groq,
mistral, openai, xai.
Usage Examples:
OAI.DBA.FILL_CHAT_MODELS('sk-xxxx', 'openai');
OAI.DBA.FILL_CHAT_MODELS('sk-ant-xxx', 'claude');
Google DeepMind's Gemini does not currently offer an API for LLM listing, so you use:
OAI.DBA.REGISTER_CHAT_MODEL('{llm-vendor-tag}','{llm-name}');Usage Example:
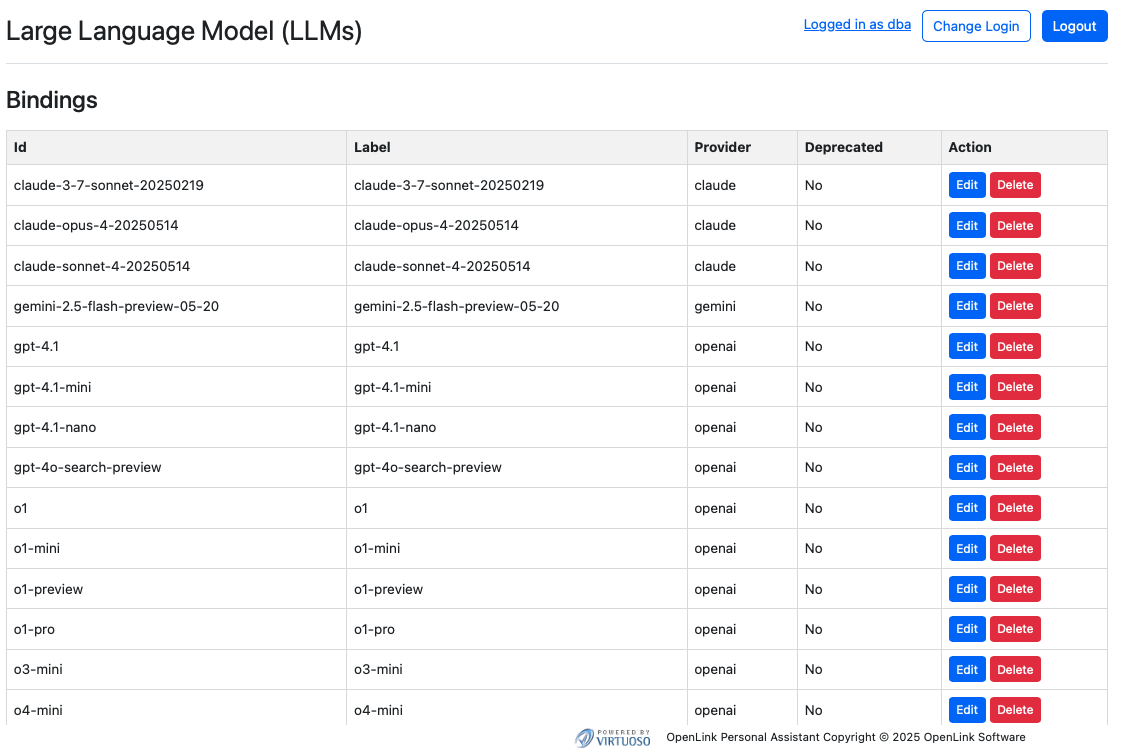
OAI.DBA.REGISTER_CHAT_MODEL('gemini','gemini-2.5-flash-preview-05-20');You can view the effects of this command via the Bound LLMs endpoint at:
https://{CNAME}/chat/admin/models.vsp
System-Wide LLM API Key Registration
To negate the need to present API Keys for bound LLMs at login time, you can register the API Keys for your chosen LLMs via the following command using the Conductor or ISQL command line interfaces:
Command Syntax:
OAI.DBA.SET_PROVIDER_KEY('{llm-vendor-tag}', '{api-key}');Usage Examples:
OAI.DBA.SET_PROVIDER_KEY('openai','sk-svcacct-xxx');
OAI.DBA.SET_PROVIDER_KEY('claude','sk-ant-api03-xxx');
OAI.DBA.SET_PROVIDER_KEY('gemini','AIxxxx');
Application Programming Interface (API) Access
Your OPAL instance is also API-accessible, providing functionality for issuing and revoking credentials in the form of:
- Dynamically negotiated OAuth access tokens
- Issued OAuth Credentials and Bearer Tokens
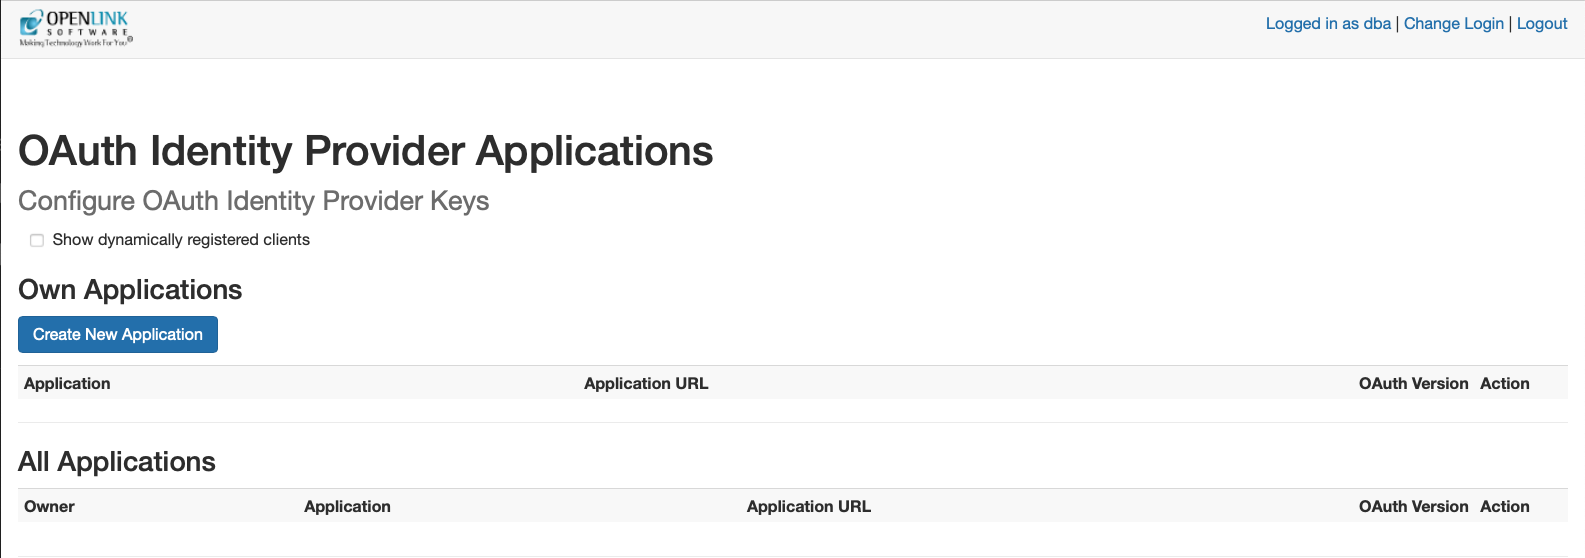
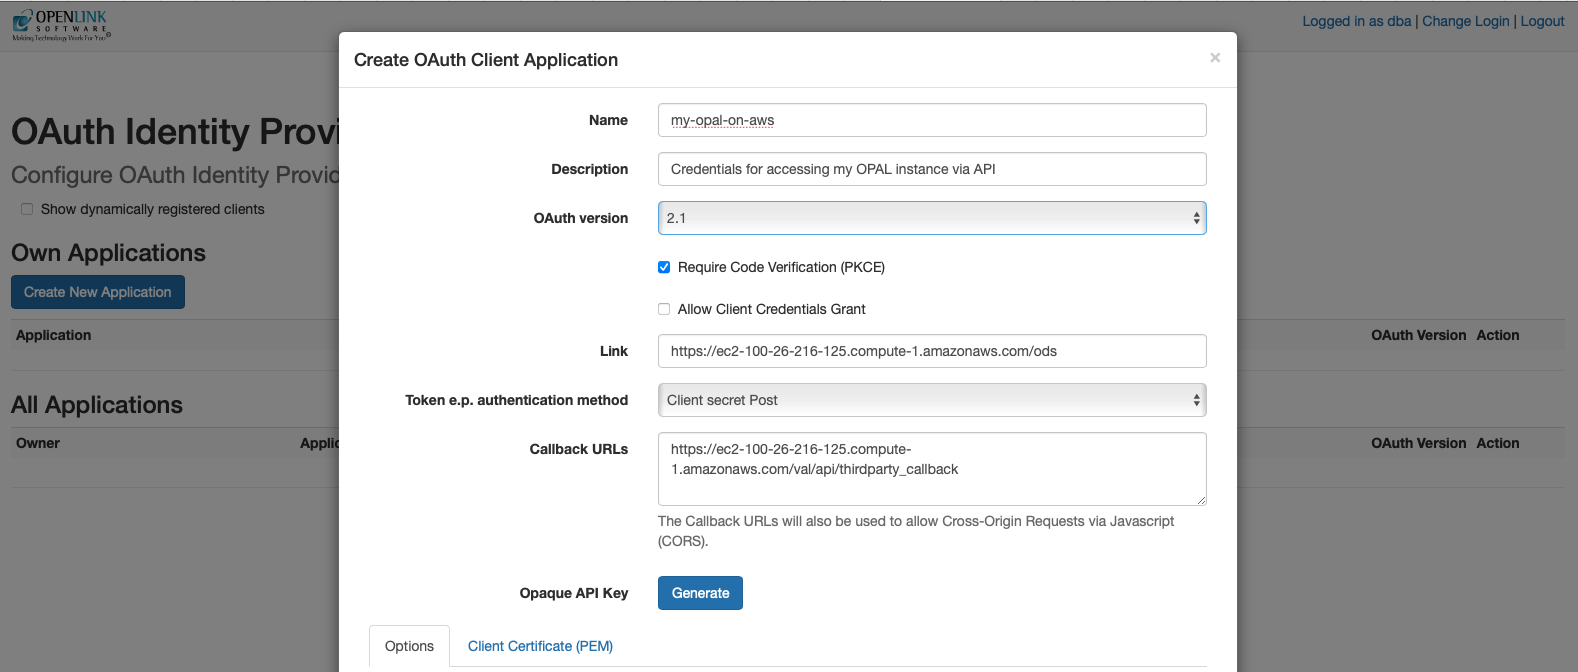
You obtain credentials using the https://{CNAME}/oauth/applications.vsp
endpoint, which presents you with the following:
Client Applications Landing Page
Credentials Issue Page
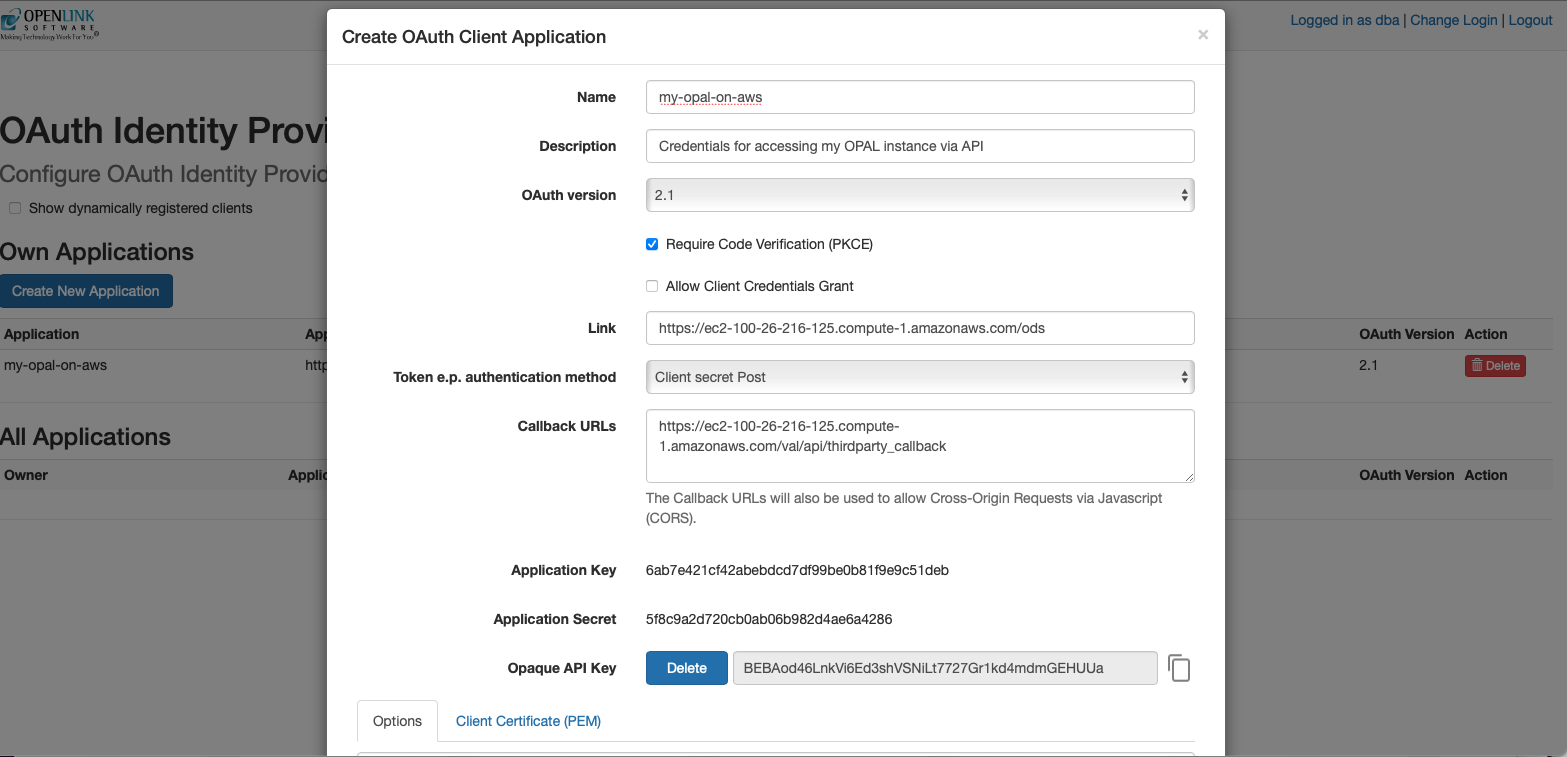
Once your credentials have been generated and copied to a safe location, you are ready for API-based interaction with your instance using protocols such as the Model Context Protocol (MCP) and the Agent-2-Agent (A2A) Protocol.
Model Context Protocol (MCP) Usage
OPAL includes built-in support for the MCP protocol as both a client and a server, supporting the Server Sent Events (SSE) and Streamable HTTP transport options. This protocol offers direct access to AI Agents/Assistants created using natural language via Markdown with native stored procedures or external OpenAPI-accessible web services as the underlying tooling for executing operations.
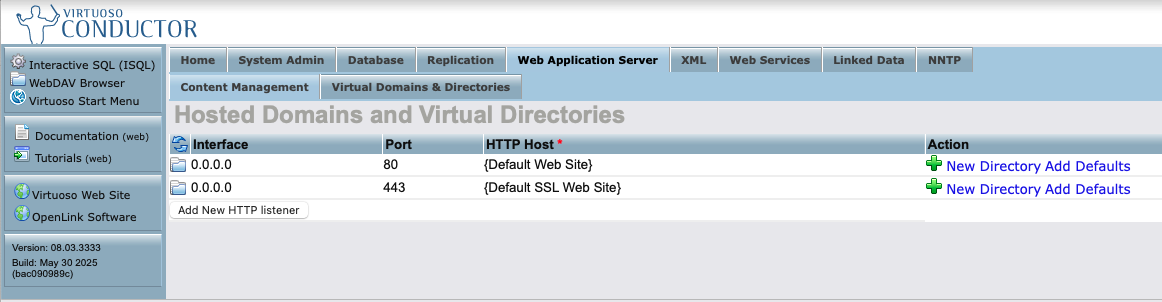
To enable use of this protocol, you will need to set up CORS access for your MCP client regarding the following virtual directories via the Conductor UI:
/.well-known/OAuth2
Here's a screenshot sequence depicting how this task is performed for the
/OAuth2 virtual directory.
HTTP Server's Virtual Domains
Virtual Directories Listing for the HTTPS Virtual Domain
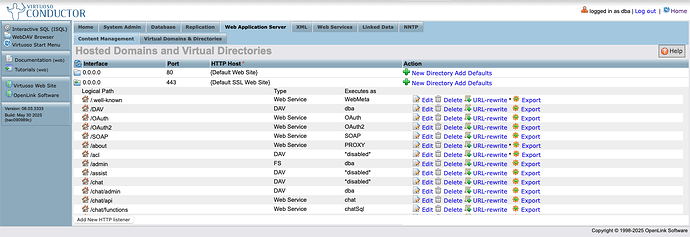
CORS Accepted Client Origins Listing
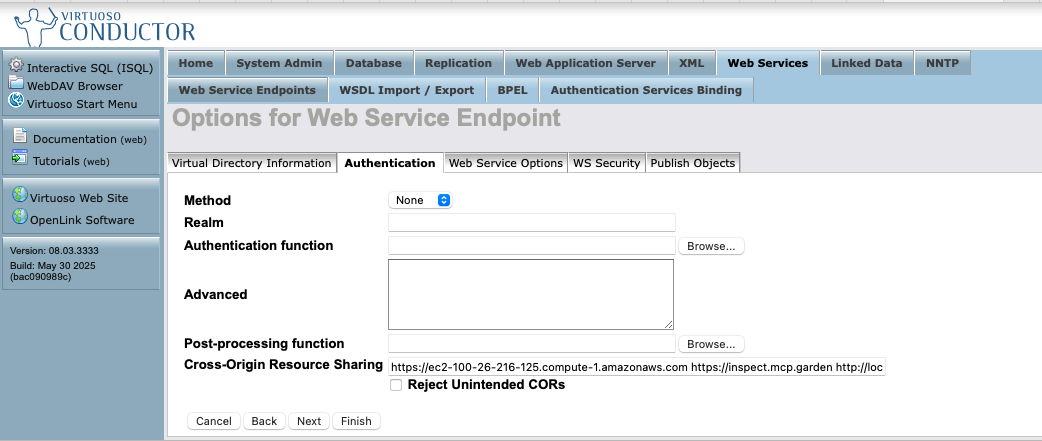
Note: Click "Finish" and then "Save Changes" for the CORS settings to take effect.
MCP Server Endpoints
The following endpoints are automatically generated for your OPAL instance:
https://{CNAME}/chat/mcp/messages– for the Streamable HTTP transporthttps://{CNAME}/chat/mcp/sse– for the Server Sent Events transport
Other MCP Interaction Options
The following MCP Servers also offer bridge-based access to your OPAL instance, courtesy of the stdio transport leveraging data access protocols such as ODBC (Open Database Connectivity) for JavaScript/TypeScript runtimes (e.g. node.js), JDBC (Java Database Connectivity) for Java runtimes, Python ODBC (pyODBC) for Python runtimes, and ADO.NET for DotNet runtimes:
- OpenLink Generic MCP Server for ODBC
- OpenLink Generic MCP Server for JDBC
- OpenLink Generic MCP Server for pyODBC
- OpenLink Virtuoso MCP Server for ADO.NET
Claude Desktop
Here's the JSON-based MCP Server configuration template for Claude Desktop.
{
"mcpServers": {
"{Your-Designated-MCP-Server-Name-For-SSE}": {
"command": "npx",
"args": [
"mcp-remote",
"https://{CNAME}/chat/mcp/sse"
]
},
"{Your-Designated-MCP-Server-Name-For-Streamable-HTTP}": {
"command": "npx",
"args": [
"mcp-remote",
"https://{CNAME}/chat/mcp/messages"
]
}
}
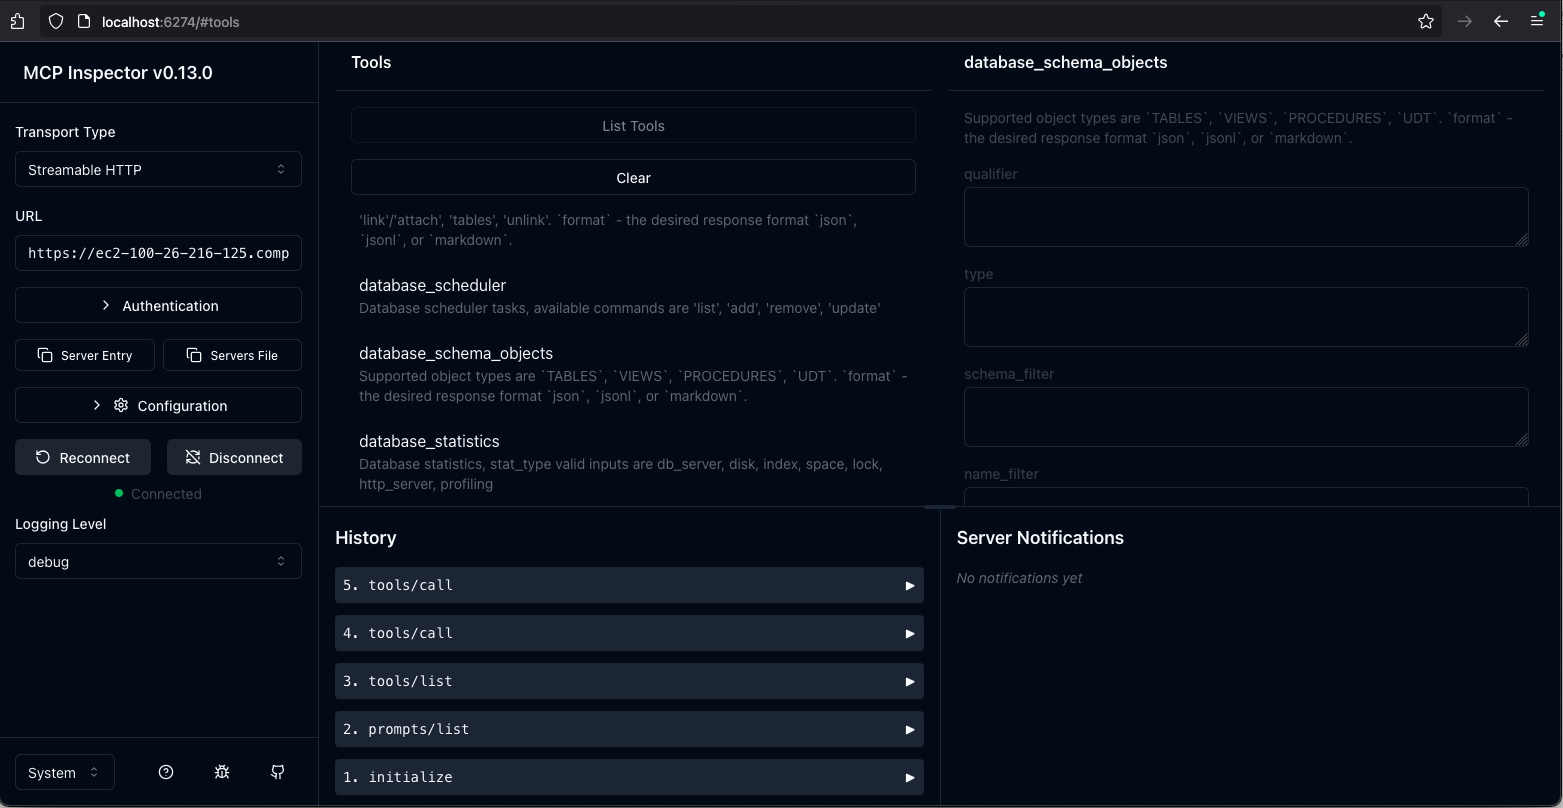
}MCP Inspector
By default, your AWS hosted OPAL instance uses an HTTPS configuration based on a self-signed certificate generated by Virtuoso. As a result, you need to set the following environment variable before starting your MCP inspector sessions:
export NODE_TLS_REJECT_UNAUTHORIZED=0Naturally, if you reconfigure your instance to use your CA-signed certificate or leverage Virtuoso's native support for the ACME protocol, you can work around this MCP inspector interaction limitation.
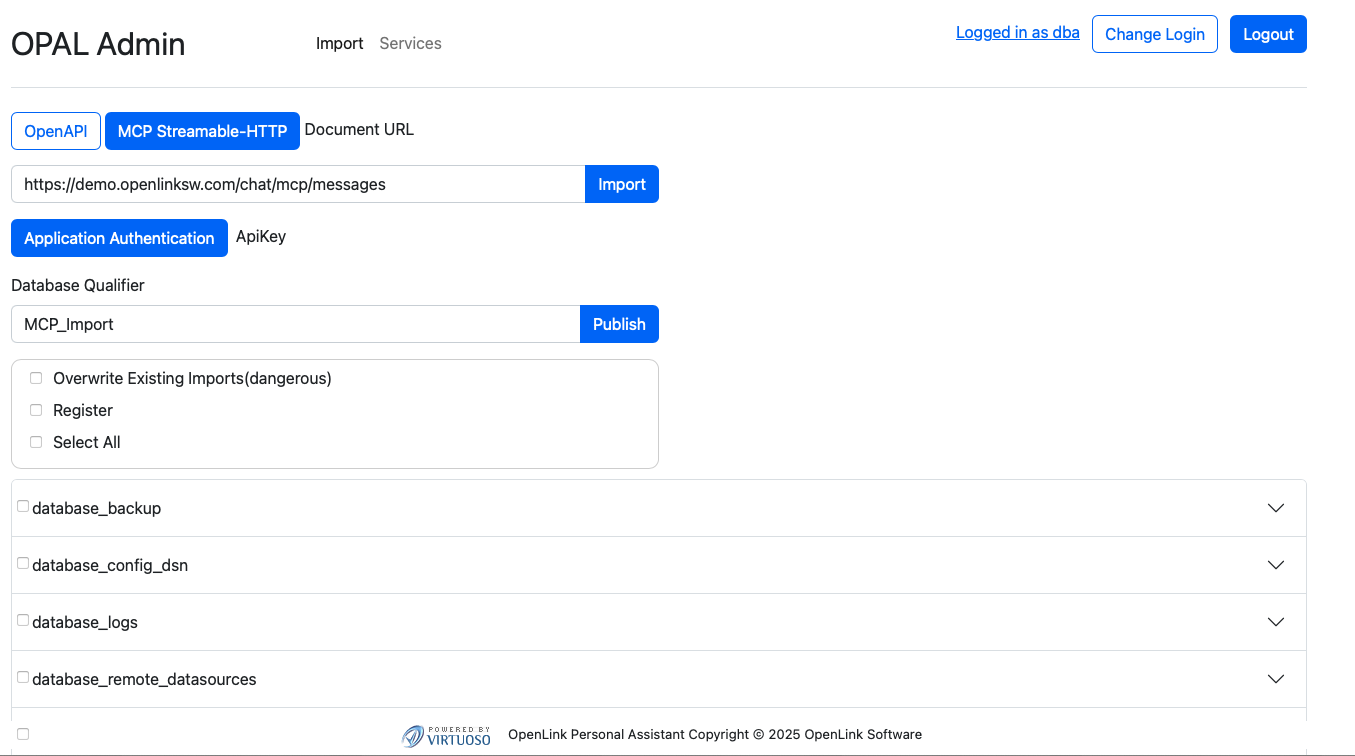
Your OPAL instance as an MCP Client
As an MCP client, OPAL is able to bind to tools published by any MCP Server that provides a Streamable HTTP endpoint. For example, our public endpoints:
https://demo.openlinksw.com/chat/mcp/messageshttps://linkeddata.uriburner.com/chat/mcp/messages
You can test this capability using our public MCP endpoints via the following steps:
1. Obtain Access Credentials in the form of an API Key
Go to the following endpoint for your AWS instance: https://{CNAME}/chat/admin/
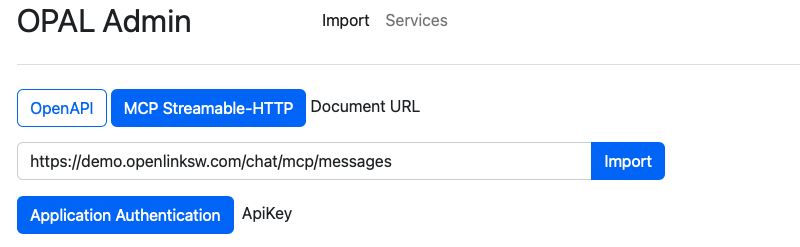
2. Click on the "Application Authentication" button
This presents an authentication dialog from which you can select the "API Key" tab for registering the API Key obtained in step 1
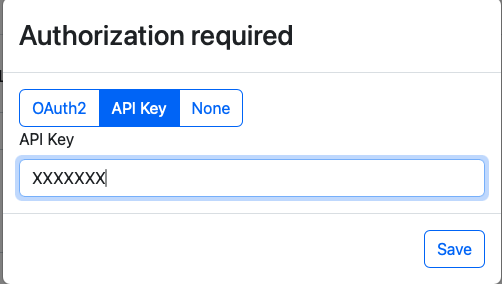
3. Authenticate
If successful you will be presented with a list of tools from the remote MCP server.
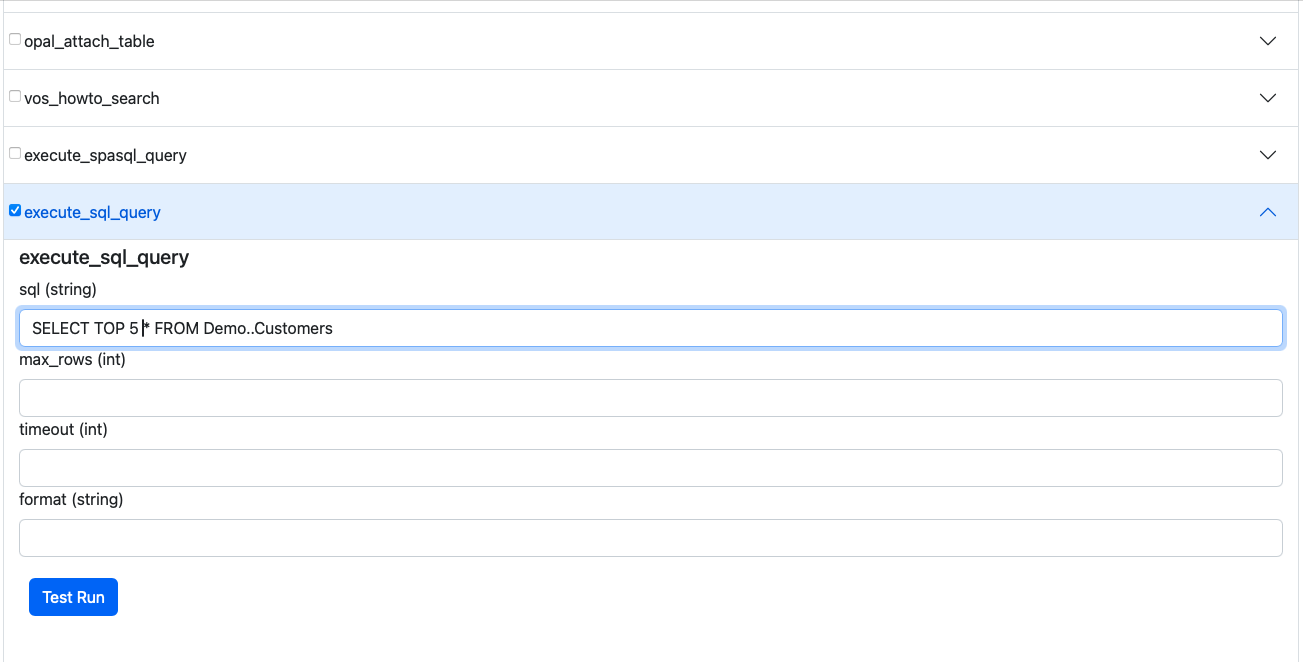
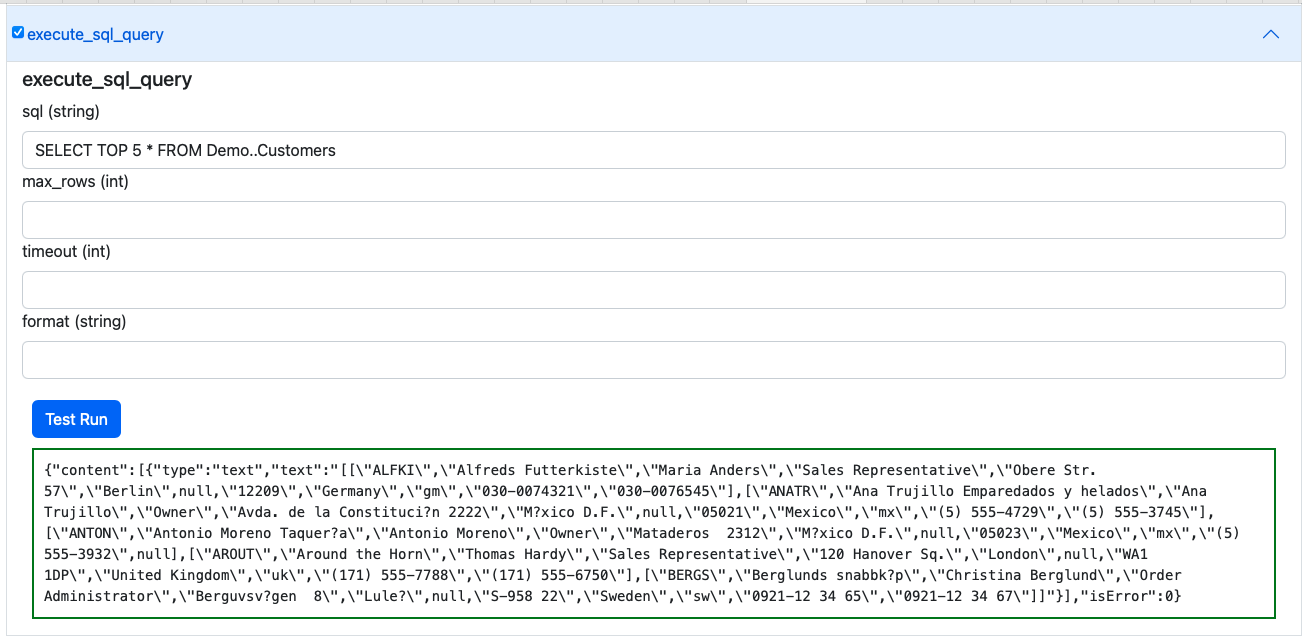
4. Select a Tool of interest from the MCP Server
For example, execute_sql_query and then expand by clicking on the expand control
to interact with the SQL capture interface.
Agent-2-Agent (A2A) Protocol Usage
A2A support provides access to AI Agents/Assistants created and deployed using your OPAL
instance. It also enables their use in the construction of sophisticated Agentic workflows
that route requests across these Agents. Agents are discoverable to all A2A client
applications and services via an automatically generated JSON-based Agent Card situated at:
https://{CNAME}/.well-known/agent.json. This file comprises the description of
an Agent (named "OPAL Agent") that's equipped with a collection of skills, each of which is
associated with an Agent/Assistant comprising MCP-accessible or directly-accessible tools
that are mapped to operations based on native stored procedures, OpenAPI-compliant web
services, or tools published by other MCP servers.
Default Agent Card for OPAL instances
{
    "name": "OPAL Agent",
    "description": "OpenLink AI Layer",
    "url": "https://ec2-100-26-216-125.compute-1.amazonaws.com/chat/api/a2a",
    "version": "1.0.0",
    "provider": {
        "organization": "OpenLink Software",
        "url": "https://www.openlinksw.com"
    },
    "authentication": {
        "schemes": [
            "OAuth2"
        ],
        "credentials": "{\"authorizationUrl\":\"https://ec2-100-26-216-125.compute-1.amazonaws.com/OAuth2/authorize\",\"tokenUrl\":\"https://ec2-100-26-216-125.compute-1.amazonaws.com/OAuth2/token\",\"scopes\":[\"openid\",\"profile\"]}"
    },
    "capabilities": {
        "streaming": true,
        "pushNotifications": false,
        "stateTransitionHistory": false
    },
    "defaultInputModes": [
        "text",
        "text/plain"
    ],
    "defaultOutputModes": [
        "text",
        "text/plain"
    ],
    "skills": [
        {
            "id": "system-data-twingler-config",
            "name": "OpenLink Data Twingler v2.0.4",
            "description": "OpenLink Data Twingler v2.0.4",
            "tags": []
        },
        {
            "id": "system-database-admin-config",
            "name": "Virtuoso DB Admin Assistant v1.0.0",
            "description": "Virtuoso DB Admin Assistant v1.0.0",
            "tags": []
        },
        {
            "id": "system-uda-support-assistant-config",
            "name": "OpenLink Support Agent for ODBC and JDBC v1.0.22",
            "description": "OpenLink Support Agent for ODBC and JDBC v1.0.22",
            "tags": []
        },
        {
            "id": "system-val-admin-config",
            "name": "Virtuoso Authentication Layer (VAL) Assistant v1.0.0",
            "description": "Virtuoso Authentication Layer (VAL) Assistant v1.0.0",
            "tags": []
        },
        {
            "id": "system-virtuoso-support-assistant-config",
            "name": "Virtuoso Support Agent v1.1.45",
            "description": "Virtuoso Support Agent v1.1.45",
            "tags": []
        }
    ]
}
A2A Usage Example
Here's a simple example from the A2A Samples Collection from OpenLink's fork of Google's A2A repository on Github.
Instructions take the form:
User: [Using <skill-name>], perform <operation>.
Where [<>] is optional and <> is mandatory.
Here's output captured from a session involving an A2A client and an OPAL Agent:
npx tsx src/cli.ts https://{CNAME} {OPAL-INSTANCE-API-KEY}
ENDPOINT {CNAME}/chat/api/a2a
✓ Agent Card Found:
  Name:        OPAL Agent
  Description: OpenLink AI Layer
  Version:     1.0.0
  Streaming:   Supported
No active task or context initially. Use '/new' to start a fresh session or send a message.
Enter messages, or use '/new' to start a new session. '/exit' to quit.
OPAL Agent > You:
OPAL Agent > You: /new
✨ Starting new session. Task and Context IDs are cleared.
OPAL Agent > You: Using the Data Twingler, execute: SPARQL SELECT ?s ?name WHERE {
SERVICE <https://dbpedia.org/sparql> {
  SELECT DISTINCT * WHERE {
    ?s a foaf:Person; foaf:name ?name.
  } LIMIT 5
}}
Sending message...

OPAL Agent [10:45:58 AM]: ℹ️ Task Stream Event:
ID: 7557962efbbb266b16198632ca925237,
Context: 5bf8bc79a99845b8bc4900452d2d31fb,
Status: submitted
   Task ID updated from N/A to 7557962efbbb266b16198632ca925237
   Context ID updated from N/A to 5bf8bc79a99845b8bc4900452d2d31fb

OPAL Agent [10:46:09 AM]: 📄 Artifact Received: (unnamed)
(ID: a0c76a0c-4152-11f0-a842-9a642c1c243f,
Task: 7557962efbbb266b16198632ca925237,
Context: 5bf8bc79a99845b8bc4900452d2d31fb)
  Part 1: 📝 Text: Here are the results of your SPARQL query:

| s                                               | name               |
|-------------------------------------------------|--------------------|
| [CaMia Hopson](http://dbpedia.org/resource/CaMia_Hopson) | CaMia Jackson      |
| [Cab Calloway](http://dbpedia.org/resource/Cab_Calloway) | Cab Calloway       |
| [Cab Kaye](http://dbpedia.org/resource/Cab_Kaye) | Cab Kaye           |
| [Cabbrini Foncette](http://dbpedia.org/resource/Cabbrini_Foncette) | Cabbrini Foncette  |
| [Cabell Breckinridge](http://dbpedia.org/resource/Cabell_Breckinridge) | Cabell Breckinridge |

These are distinct individuals identified as persons with their names
retrieved from the DBpedia SPARQL endpoint.

OPAL Agent [10:46:09 AM]: ✅ Status: completed
(Task: 7557962efbbb266b16198632ca925237,
Context: 5bf8bc79a99845b8bc4900452d2d31fb) [FINAL]
   Task 7557962efbbb266b16198632ca925237 is final. Clearing current task ID.
--- End of response stream for this input ---
Frequently Asked Questions
What is OPAL?
OPAL (OpenLink AI Layer) is an AI-powered platform that provides integration with multiple Large Language Models (LLMs) and supports advanced protocols like MCP and A2A for building AI assistants and agents.
How do I secure my OPAL instance?
Use Attribute-based Access Controls (ABAC) by executing SPARQL commands to set up fine-grained access controls that determine who can log in and under what restrictions.
Can I avoid entering API keys on every login?
Yes, you can register LLM API keys system-wide using the
OAI.DBA.SET_PROVIDER_KEY() command to avoid repetitive entry.
What is MCP?
Model Context Protocol (MCP) is a protocol that enables AI applications to securely connect to external data sources and tools, providing standardized access to resources.
Glossary of Terms
A2A (Agent-2-Agent Protocol)
A communication protocol that enables AI agents to interact and coordinate with each other in sophisticated workflows.
ABAC (Attribute-based Access Control)
A security model that uses attributes, policies, and environmental conditions to control access to resources.
LLM (Large Language Model)
AI models trained on large amounts of text data to understand and generate human-like text.
MCP (Model Context Protocol)
A protocol that enables AI applications to securely connect to external data sources and tools.